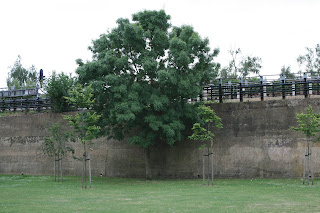
I have been asked how I go about making my trees, so here is a brief explanation.
Always try and take your photos on an overcast day, strong sunlight is no good for making textures. This can be a pain, but the results are so much better in game. (images are reduced in size on this blog, the originals are much higher res)
Always try and take your photos on an overcast day, strong sunlight is no good for making textures. This can be a pain, but the results are so much better in game. (images are reduced in size on this blog, the originals are much higher res)

From the photograph I crop the image so that it is square with the tree as central as I can make it.
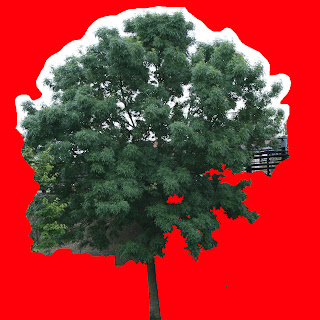
I then take the select tool (make sure that there is no pixel feathering to keep a hard edge) and start carving the area I want to be transparent. I select an area then press delete (in photoshop) I make sure my base colour is red so that I can see how the profile will look. I start with large cuts then make smaller ones. Because the image is such high res you can be a bit creative with your cuts, don't try and cut every leaf, you will go mad... The guys are work laugh aat me when I start.


Another trick I do is I clone the image then make it 5 or 6 colours (Index colour/reduced colour palette) I then select the sky and press delete, I select all the red from the cloned image then paste it over my original. The result is the image below.
If you still have a white pixels around your tree from the sky I reduce this further by selecting the red and expanding the selection by 1 pixel. this can take parts of the tree away that you wanted to keep but you can always do this in layers and keep the original.
Once you are happy with the cut out, select the red and replace the red with a more suitable green and brown around the stump this is for the mips so that you do not get a halo around the tree. Still with the selection on create an alpha channel from that selection.
Now you need to reduce the image to a 512/512 or whatever res you are using. In photoshop I reduce the image but making sure nearest neighbour is selected (preserve hard edges) in the pixel blending. This will give your tree a jaggy look but works well for leaves. also your alpha channel is still black and white with no hints of gray..
You can always adjust the brightness/saturation etc before saving. I find it best to tone down the colours for RailWorks.
Save as a . ace and export from depot.
Below is the tree in game.
Derek


2 comments:
Thanks Derek
Every small tip helps when you are trying out new techniques and as the foliage is a great feature of RW/RS, it seems well worth having a go at making some home grown stuff.
very nice art. always read your articles with very great interest.
I Think this is a new tree for foliage pack2 :)
Post a Comment