As I finish off my cuppa tea I browse the forums and see an intresting debate on how long it takes to make a loco.
I have mentioned this before but I am happy to explain this in a little more detail.
It does depend on the loco but this is a rough guide for an RS.com artist. (Steam locos tend to take longer)
Man day = 6 hours at least 1 hour a day is spent making tea and chatting about biscuits just to upset those that don't like us talking about biscuits.
1 - day photography research trip
1-2 days internet/email research
Loco
0.5 day setting up plan views and scale
5-10 days modelling
3-5 days unwrapping
2-4 days texturing
1 day per skin
1 day details
1 day shadow model
1 day loding
2-3 days setting up xml and testing performance
Cab
5-10 days modelling
3-5 days unwrapping
0.5 day shadow model
2-4 days texturing
1 day animating/testing
1 day setting up xml
So, a loco can take between 200 and 300 hours to make and that is by a proffessional model maker with many years worth of experience. (with help from a SME) It is only a guide and some locos take less and some much more, there are a few rather large locos in development that almost double this time.
Also, the above has not mentioned the sound recordings, scenarios, testing, marketing or other rollingstock that might go with it.
Derek
Friday, 31 July 2009
Heading North
This weekend I am heading back to Bishop with my daughter to camp in my brothers back garden.
No real plan, but I hope to gather images of places I've missed, King James School could be a good one to document, along with cockton Hill as it sat right next to the track on the West Auckland Branch.
Hope to share some images with you next week.
On a footballing note it is a very sad day, the game has lost a real northern gentleman, Sir Bobby Robson.
Derek
Wednesday, 29 July 2009
Wagon models
In between random meetings, conversations, schedules, emails and support I do sit down and do some work (not much I know).
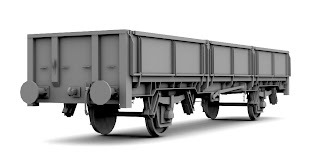
Last week I set about making a few of the many wagons/coaches/vans/cars (whatever you want to call them) that need to be made for various future consists.
Here are two models I've fleshed out, a straight PCA and an OCA.
Derek
Last week I set about making a few of the many wagons/coaches/vans/cars (whatever you want to call them) that need to be made for various future consists.
Here are two models I've fleshed out, a straight PCA and an OCA.


Derek
Thursday, 23 July 2009
FF Trees
I have been asked how I go about making my trees, so here is a brief explanation.
Always try and take your photos on an overcast day, strong sunlight is no good for making textures. This can be a pain, but the results are so much better in game. (images are reduced in size on this blog, the originals are much higher res)
Always try and take your photos on an overcast day, strong sunlight is no good for making textures. This can be a pain, but the results are so much better in game. (images are reduced in size on this blog, the originals are much higher res)

From the photograph I crop the image so that it is square with the tree as central as I can make it.

I then take the select tool (make sure that there is no pixel feathering to keep a hard edge) and start carving the area I want to be transparent. I select an area then press delete (in photoshop) I make sure my base colour is red so that I can see how the profile will look. I start with large cuts then make smaller ones. Because the image is such high res you can be a bit creative with your cuts, don't try and cut every leaf, you will go mad... The guys are work laugh aat me when I start.
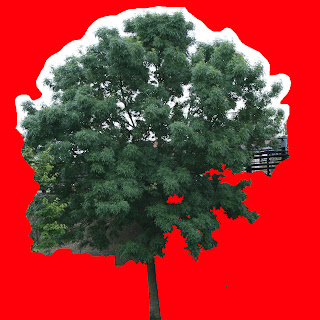

Another trick I do is I clone the image then make it 5 or 6 colours (Index colour/reduced colour palette) I then select the sky and press delete, I select all the red from the cloned image then paste it over my original. The result is the image below.
If you still have a white pixels around your tree from the sky I reduce this further by selecting the red and expanding the selection by 1 pixel. this can take parts of the tree away that you wanted to keep but you can always do this in layers and keep the original.
Once you are happy with the cut out, select the red and replace the red with a more suitable green and brown around the stump this is for the mips so that you do not get a halo around the tree. Still with the selection on create an alpha channel from that selection.

Now you need to reduce the image to a 512/512 or whatever res you are using. In photoshop I reduce the image but making sure nearest neighbour is selected (preserve hard edges) in the pixel blending. This will give your tree a jaggy look but works well for leaves. also your alpha channel is still black and white with no hints of gray..

You can always adjust the brightness/saturation etc before saving. I find it best to tone down the colours for RailWorks.
Save as a . ace and export from depot.
Below is the tree in game.

Derek
Monday, 20 July 2009
Stumped
Yey! What a good morning of cricket.
Started the long task of changing all the tree textures from the IOW and the foliage pack. 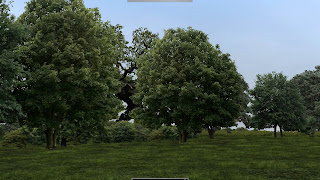
I really did think England would clutch defeat from the jaws of victory, look forward to the 3rd test.
Started the long task of changing all the tree textures from the IOW and the foliage pack.
I took those as place holders and slowly updating them.
Once again I have spend the odd hour here and there wandering around woodlands.
Once again I have spend the odd hour here and there wandering around woodlands.

I've also been back on ebay tracking down more pics of the area, this time the rail bridge over the Gaunless at Tindal Cresent and a cracking one of the West Signal box at Bishop Auckland.
I'll scan them in and pop them up next week.
Derek
Flickr
Hi,
Just a quick post to remind those intrested to keep one eye on the flickr link from RS.com
http://www.flickr.com/photos/railsimulator/
Many of our research pics are going up and for those of you who like me enjoy engineering detail shots then you are in for a treat, to normal people it just looks a tad sad.
:)
Derek
Saturday, 18 July 2009
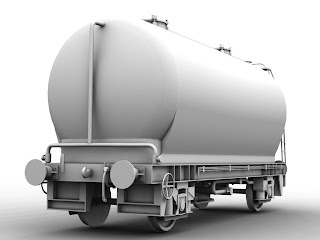
3 is the magic number
I know, I know, I said no loco work, but I just felt the need to fill in an hour or 2 while daughter was at a birthday party and something to help take my mind of clicking the refresh button on the cricket score.

Derek
Just tinkering really, but worth a render, while the basic shape is pretty simple, there is a lot of pipe detail to model, just chipping away at it really till I get shouted at.

Derek
Tuesday, 14 July 2009
1 Cockton Hill Road


The building on the corner of the Rail Bridge, 1 Cockton Hill road. As a lad I use to deliver newspapers to this building, I also had a mate who left me an extra pint of milk here every morning. (I love ice cold Milk)
Ok, this building has a 1024/1024 texture on it. I will leave for the time being (I can always reduce back to 512/512 later if need be) as it is close to the track. The buildings alongside it will not be so high res. Hopefully the change in res will not be to noticeable.
As you can see I mostly robbed the photograph. The work was mainly in reworking the image into a useable texture and being canny about which bits I mirrored and reused to avoid the butterfly effect.
Derek
Sunday, 5 July 2009
prototype and fictional?
Just as my wife prepares to leave me home alone for another week to look after our daughter and cat I found just enough time to post a few of my thoughts on this topical subject.
One thing is for certain, no 2 people think alike when it comes to creating routes.
Creating a route is a labour of love no matter which package you use (speaking from experience), it's normally easier to create a fictional route when you do not have to spend hours and hours finding and checking reference images to make sure you have it just so. It also prevents thoughs who like to point out something is wrong from commenting.
However, fictional routes need creative thinking. The 3 Fictional routes in RailWorks are all based on real areas with their names changed. This allowed us to lay the track fairly quickly, it also helped us to define areas for scenery and activities.
Taking a real section of track and moulding it to your needs is a great starting point and I'd strongly recommend it to anyone who was serious about creating a route.
For me though, I'm not interested in spending my time making a fictional route (unless it was on the moon or Mars, that way you really could let your imagination go!)
I started my route for very different reasons; I did not do it for others to play, I did it for myself.
My plan was and still is to create a number of large oil paintings of the station complex. I've spent hundreds of pounds researching it and many thousands of hours reading/searching and drawing little areas so I can get an idea of where everything was.
Some areas of Bishop have changed so much that you'd never know what was there, very few books document the recent past, there are not that many pictures around and so few seem to even remember what it was really like.
So for me the devil is in the details. I want the right building in the right place to the right scale.
Now, I'll get some bits wrong and some others I'll have to make a best guess from the pictures and text I have. However the beauty of this is I can always update it.
I am currently making oak terrace, it is seen in many of the photos of Bishop Station and it is still there so I have no reason to get it wrong, however it has been a chore organising the photo to make a 512/512 texture.
Here is a sneak peak of the wip. (Hopefully put up the final image in the next day or so)

This route will get finished and released when I am happy with it. )
thanks
d
Subscribe to:
Posts (Atom)